
MADCTY Van Build Oct 2026 Update
MADCTY / Transit build journal / Part 1
Building a Four-Season 48V Ford Transit
What I’ve built, changed and learned so far.
There is a point in a camper van build where it stops looking like a van with some parts bolted into it and starts looking like a collection of interconnected systems.
I think I’ve reached that point.
Photo placeholder
The van, as it stands today
Replace this Text Block with an Avada Image Element: a rear three-quarter view showing the Carbonized Grey Transit, roof rack, spare-tire carrier and ladder.
Over the past couple of months, the 2026 Ford Transit T350 AWD High Roof Extended that started as an empty cargo van has gained an insulated and heated floor, insulated walls and ceiling, the beginnings of its permanent cabinetry, a hydronic heating system nearing commissioning, most of a 48-volt electrical system, alternator charging, solar charging, 12-volt distribution, control and monitoring hardware, the rough-in for the 120-volt system, and a roof that is already functioning as a fairly serious utility platform.
The roof rack is installed. All 800 watts of solar are mounted and producing power through the Victron MPPT. The OutEquip Summit 2 air conditioner is installed and operating. The roof fan is working. Starlink internet is working. A 50-inch light bar is installed across the front of the rack.
At the rear, the driver-side door now carries the spare tire externally along with a ladder that provides access to everything above.
There is still a lot of van left to build. There are no beautiful finished cabinets yet. The water system isn’t complete. The final lighting isn’t installed. Outlets and breakers still need to go in. Interior wall and ceiling panels are still ahead.
But underneath all of that finish work, most of the infrastructure that will determine whether this van actually works well has now been built.
And that part has turned out to be much more complicated—and much more interesting—than I expected.
The build at a glance
2026 Ford Transit
T350 AWD · High Roof · Extended
48 V house system
Two Epoch batteries · Victron distribution
800 W rooftop solar
Four 200 W panels · MPPT 150/35
5,000 VA inverter
MultiPlus-II 48/5000/70
Four-season ambition
Saskatchewan winters and hot summers
Build status: October 2026. Winter capability remains a design target to be proven through commissioning and use.
01 / The design brief
The Goal Was Never Just to Build a Camper Van
From the beginning, this build was intended to be a four-season vehicle.
Living in Saskatchewan changes the definition of “four season.” I’m not building around the possibility of a slightly chilly night. I want the van to remain functional when temperatures are well below freezing, potentially into the -30°C range, while still being comfortable during a 30°C-plus summer.
That immediately affected almost every major design decision. It changed how I approached insulation. It was one of the main reasons for installing hydronic floor heat. It influenced tank placement. It pushed me toward a large electrical system. It made serviceability important because a system failure at -30°C is very different from a system failure at a summer campground.
At the same time, I’m 6’3”, so there was another competing objective from day one: preserve as much interior height as possible.
Those two priorities—serious insulation and minimal loss of headroom—have been fighting each other through almost every stage of the build.
The solution has rarely been the absolute maximum of anything. Instead, the build has become an exercise in finding the point where insulation, weight, space, complexity, cost and serviceability all make sense together.
02 / Floor and insulation
Building the Floor Became a Project of Its Own
The floor was one of the first places where that balancing act became obvious.
A simple camper floor could have been some insulation, plywood and finished flooring. Mine became a layered assembly incorporating insulation, hydronic heat distribution and corrosion isolation while still trying to preserve interior height.
The first layer was XPS cut into strips to fill the valleys between the Transit’s factory floor ribs. Rather than simply bridging across the steel ribs and leaving air cavities beneath the main insulation layer, the goal was to create a relatively continuous supporting surface.
On top of that went one inch of SOPRA-XPS 30 rigid insulation. XPS made sense for the floor because it provides good insulation for its thickness, has useful compressive strength and is readily available.
Originally, I considered routing the hydronic tubing directly into that primary one-inch insulation layer. Eventually I moved away from that idea.
Instead, I added another half-inch layer of XPS dedicated specifically to the radiant heating system. That gave me separation between the structural insulation system and the heating system.
The 3/8-inch oxygen-barrier PEX could be routed into the sacrificial half-inch layer without substantially cutting into the primary insulation beneath it.
It cost me another half-inch of interior height, which I definitely noticed given my height, but it was one of those compromises where the cleaner installation won.
The floor, bottom to top
- Factory steel floor.
- XPS fillers between the ribs.
- 1-inch SOPRA-XPS 30.
- 1/2-inch routed XPS with 3/8-inch oxygen-barrier PEX.
- 1/16-inch aluminum heat spreader.
- 12 mm BS1088 marine plywood.
At potential body-contact points, 1/16-inch cork isolates the aluminum from the steel.
Photo placeholder
Before the floor disappeared
Replace with an archive photograph of the routed XPS and installed PEX loops before the aluminum and plywood went down.
Adding Aluminum—and Making Sure It Didn’t Touch the Van
Above the PEX is a 1/16-inch aluminum heat-spreader layer.
The purpose is straightforward. A piece of PEX is essentially a narrow hot line. Aluminum distributes that heat laterally across a much larger area of the floor rather than allowing obvious hot strips directly over each tubing run.
But putting a large sheet of aluminum inside a steel-bodied vehicle creates another consideration: galvanic corrosion. I did not want the aluminum sitting directly against vehicle steel anywhere around its perimeter.
The solution was to isolate it. Around the perimeter and other potential contact points, I used 1/16-inch cork to maintain separation between the aluminum and the steel body. That provides a physical barrier between the dissimilar metals while also helping isolate the aluminum mechanically.
The finished structural layer above that is 12 mm BS1088 marine-grade plywood. Again, this was partly about balancing thickness against strength. Going thicker would have been easy. It also would have continued eating into interior height.
Marine plywood gave me a high-quality floor structure without needing an excessively thick panel.
There are simpler ways to build a van floor. But this floor isn’t only a floor. It is insulation, structure and one of the van’s primary heating systems all occupying roughly the same space.
Learning That Everything Doesn’t Need to Be Permanently Glued Together
Another lesson from the floor was that more adhesive is not automatically better.
There is a temptation when building a van to glue everything permanently to everything else. It feels strong and reassuring.
But vans move. The body twists. Different materials expand at different rates. Aluminum, wood, foam and steel do not behave identically as temperatures change from a Saskatchewan winter to a hot summer.
I increasingly started thinking less about permanently entombing components and more about controlling movement while still allowing the van and its systems to be serviceable.
Some things need to be structural. Some things need to be restrained. Some things simply need to stay where they belong.
Serviceability has increasingly become one of my design criteria. If something fails five years from now, I want a reasonable chance of getting at it.
Photo placeholder
The small details matter
Replace with a close-up of the aluminum layer, cork isolation and marine-plywood floor edge.
Insulating the Walls Without Turning the Van Into a Spray-Foam Sculpture
The walls and ceiling followed a different strategy. Rigid foam works extremely well on a flat floor. A Transit wall is not flat.
There are ribs, cavities, structural members, wiring paths and compound curves everywhere. I also wasn’t interested in filling the entire body with spray foam. Spray foam can produce an effective insulated shell, but it also permanently buries access to the body and anything behind it.
Instead, I used Tec Vanlife DUCK Liner against the sheet metal and 3M Thinsulate over it.
The DUCK Liner provides a closed-cell layer directly against the steel while also helping with vibration and sound. Thinsulate fills the irregular cavities and provides the bulk of the wall and ceiling insulation.
Where wood furring or other structures cross the vehicle ribs, neoprene provides another isolation layer.
I also made a deliberate decision not to cover the entire van with heavy butyl sound-deadening material. That is common in van builds, but once the DUCK Liner, Thinsulate, isolated furring, cabinetry and finished wall surfaces are installed, adding large amounts of additional butyl started to look like a lot of weight for diminishing returns.
If I eventually find a panel that resonates, I can treat that area specifically.
That philosophy has become common throughout this project: solve the problem that actually exists rather than automatically installing every product commonly associated with van conversions.
Photo placeholder
Inside the insulated shell
Replace with a wide interior photograph showing DUCK Liner, Thinsulate and isolated furring before wall and ceiling panels are installed.
03 / Roof and exterior systems
The Roof Became Its Own Systems Project
The roof has gone through almost the same evolution as the interior. What could have been a place to install a couple of solar panels has become a working platform carrying several major systems.
A Curious Campervans roof rack provides the structure. Mounted to it are four 200-watt solar panels, giving the van 800 watts of roof-mounted solar.
Those panels are now installed, wired and producing power through the Victron SmartSolar MPPT 150/35.
Earlier in the build, I temporarily tested two panels in series into a portable power station. That was useful for verifying the panels before the house electrical system was ready.
Now all four panels are integrated with the permanent 48-volt system. That transition—from testing individual components to seeing the complete system actually operate—has been one of the satisfying parts of the build.
Photo placeholder
One roof. Several working systems.
Replace with an elevated roof photograph showing all four solar panels, the Summit 2, ventilation fan, Starlink and rack together.
Cooling Became a 48-Volt Decision Too
The rooftop air conditioner is an OutEquip Summit 2.
Choosing a 48-volt air conditioner fits the larger electrical philosophy of the van. Air conditioning is one of the biggest electrical loads in a camper, so running the compressor directly from the 48-volt battery system avoids converting battery power through the inverter before it reaches the air conditioner.
The Summit 2 is now installed and functioning. That is important because it means one of the systems I designed the large battery bank and solar system around is no longer theoretical.
The electrical architecture is actually powering the type of load it was intended to support.
The roof layout also had to account for solar-panel placement around the air conditioner, ventilation fan, rack structure and Starlink. The available space is finite, so every new system affects the others.
Ventilation Still Matters Even With Air Conditioning
The van also has a low-profile powered roof fan.
Air conditioning doesn’t replace ventilation. There will be plenty of conditions where I don’t want to run the air conditioner but still want to exchange interior air, remove cooking humidity or cool the van in the evening.
The fan is fully operational now.
The eventual plan is to integrate its speed control into the larger van-control architecture while still retaining straightforward manual operation.
That balance between automation and simple fallback control continues to shape almost every system.
Starlink Turns the Roof Into Part of the Communications System
The Starlink Mini is also installed and functional.
That changes the van in a way that isn’t really visible in a wiring diagram. The van is intended to be usable away from traditional campgrounds, but I also run businesses and create media.
Reliable internet makes it much easier to combine those two worlds.
Starlink means the roof isn’t just producing electricity and managing climate anymore. It is also part of the van’s communication infrastructure.
And Then There Is the 50-Inch Light Bar
Across the front of the rack is a 50-inch light bar.
It is not something I expect to use as ordinary highway lighting. Its purpose is much more about remote travel, campsites, backroads and situations where having a large amount of forward-area illumination can be valuable.
It also adds another consideration to the 12-volt system. Even though the van’s house architecture is 48 volts, there will always be loads that make more sense at 12 volts, particularly automotive-style equipment.
The roof therefore illustrates the electrical architecture particularly well: 48-volt air conditioning, solar feeding the 48-volt system, communications equipment, ventilation and conventional 12-volt accessories all sharing the same physical platform.
The Rear Doors Became Part of the Exterior Utility System Too
The roof created another practical question. How do I actually get up there?
A high-roof Transit is tall enough that even at 6’3”, the roof isn’t something I can realistically access from the ground.
A rear-door ladder gives me a proper route onto the rack for cleaning solar panels, inspecting equipment, servicing Starlink or simply checking something that would otherwise require carrying a separate ladder.
The driver’s rear door also now carries the spare tire externally.
Moving the spare onto the rear door accomplishes a couple of things. First, it keeps the spare accessible. Second, exterior storage and mounting becomes increasingly valuable as the underside and interior of the van fill with tanks, heating equipment, plumbing, electrical equipment and living space.
The spare-tire carrier and ladder also visually change the van. It is starting to look less like an empty Transit that happens to have solar panels and more like a purpose-built travel vehicle.
Photo placeholder
From the rear door to the roof
Replace with a portrait photograph of the driver-side rear-door spare-tire carrier and ladder, with enough space around them to show access and clearance.
04 / Heat, hot water and engine recovery
The Heating System Is Really Several Systems
The hydronic system has probably been the part of the build with the steepest learning curve.
I chose a Rixen MCS7 gasoline-based system using an Espar heater. Calling it “the heater” massively understates what the system actually does.
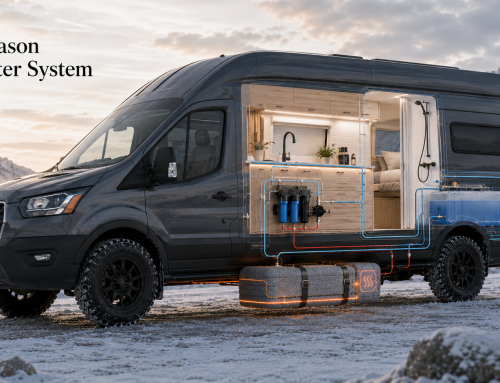
The Espar itself is mounted beneath the van chassis. The fuel system is connected to the Transit’s auxiliary fuel provision, and the combustion-air intake and exhaust system are installed underneath the vehicle.
Inside the van is a closed glycol circuit connecting several different heating functions.
There is a forced-air heat exchanger for quickly heating the cabin. There is the floor heat exchanger and mixing system supplying the 3/8-inch PEX embedded in the floor. There is a plate heat exchanger for domestic hot water. And there is another heat exchanger that will connect to the Ford engine cooling system.
That last one is particularly interesting. Instead of always burning gasoline in the Espar to make heat, the van will eventually be able to recover heat from the engine while driving.
The Ford engine coolant and the Rixen glycol do not mix. They remain separate circuits with heat transferred between them through the exchanger.
In practical terms, that means driving can put heat into the hydronic system and contribute to hot water and cabin heating without requiring the Espar to produce all of that energy itself.
At this stage, the main 3/4-inch Rixen glycol plumbing is complete. The reservoir, forced-air exchanger, floor-heating circuit, domestic-hot-water exchanger and engine heat exchanger are installed. The 3/8-inch radiant floor loops are connected, as are the mixing components.
The combustion side of the Espar—fuel, intake and exhaust—is installed.
What remains is electrical connection and commissioning, filling and bleeding the glycol loop, completing the Ford coolant side of the engine heat exchanger, and plumbing the potable-water side of the domestic-hot-water exchanger.
I’m approaching the point where the heating system can stop being an assembly of components and become a functioning system.
One heat source. Several jobs.
- Forced-air cabin heating.
- Radiant floor heating.
- Domestic hot water through a heat exchanger.
- Engine heat recovery through a separate coolant circuit.
Installed and plumbed describes the current stage. Filling, bleeding and commissioning are still ahead.
Photo placeholder
The Rixen installation
Replace with a well-lit photograph showing the reservoir, heat exchangers, pumps, mixing assembly and accessible hose connections.
Hydronics Taught Me to Stop Thinking of Plumbing as “Just Plumbing”
Before this build, I understood the basic concept of plumbing. Water goes through pipes.
Hydronics quickly teaches you that this description is not particularly useful.
I’ve had to think about hose diameter, pump placement, flow restriction, mixing temperatures, trapped air, high points, expansion, coolant compatibility, heat transfer, heater protection and how to purge an interconnected system.
The engine heat-recovery circuit added another level because I’m now interfacing an aftermarket heating system with the cooling system of a brand-new Ford Transit.
That means the goal isn’t simply to make the hose fit. It needs to preserve proper engine coolant circulation, avoid creating problematic high points, use appropriate hose and fittings, and be filled and de-aerated correctly.
This is one of the areas where I have deliberately moved slower rather than treating “connected” as the same thing as “finished.”
05 / The 48-volt backbone
Then There Is the 48-Volt Electrical System
If the heating system has been the biggest plumbing education, the electrical system has probably involved the largest amount of research.
The van is built around a 48-volt house electrical architecture. That is still unusual compared with the much more common 12-volt camper system, but at the power levels I wanted, 48 volts made sense.
The inverter/charger is a Victron MultiPlus-II 48/5000/70.
A 5,000 VA inverter on a 12-volt battery system would require enormous DC currents. Moving the main house system to 48 volts dramatically reduces that current for the same amount of power.
Lower current means more manageable cable sizes, lower voltage drop and a cleaner way to support large loads such as induction cooking.
The battery bank uses two Epoch 48-volt batteries. Distribution is built around the Victron Lynx ecosystem, including the Power In, shunt and Lynx Distributor.
Solar charging comes through the Victron SmartSolar MPPT 150/35 and its 800 watts of rooftop solar. The system is monitored through a Victron Cerbo GX and GX Touch.
And although the electrical system is fundamentally 48 volts, most automotive and RV accessories still live in the 12-volt world. For that reason, a Victron Orion 48/12-30 provides regulated 12-volt power to the 12-volt distribution system.
It is effectively two electrical architectures living together: a high-power 48-volt backbone and a conventional 12-volt accessory system.
The main components
Battery bank
2 × Epoch 48 V batteries
Inverter / charger
Victron MultiPlus-II 48/5000/70
DC distribution
Lynx Power In, shunt and Distributor
Solar controller
Victron SmartSolar MPPT 150/35
Monitoring
Cerbo GX and GX Touch
12 V conversion
Orion 48/12-30
Alternator charging
Sterling BB1248120
Photo placeholder
The electrical system before the finish work
Replace with a straight-on photograph showing the Epoch batteries, Lynx components, vertical MultiPlus-II and heavy DC wiring together.
Alternator Charging Required Rethinking Where Components Belonged
Solar isn’t the only charging source. The Transit has dual factory 12-volt alternators, and I wanted to make meaningful use of them.
The problem is obvious once you think about it: the vehicle is 12 volts and the house battery system is 48 volts. The solution is a Sterling BB1248120 12-to-48-volt DC-to-DC charger.
One of the practical lessons here was that component placement isn’t just about making the electrical cabinet look neat.
Initially it would have been tempting to put the Sterling in the main rear electrical cabinet with everything else. But the high-current side of the Sterling is the 12-volt input from the vehicle.
At lower voltage, transmitting a large amount of power requires a large amount of current. Long 12-volt cable runs therefore become expensive, heavy and more susceptible to voltage drop.
So the better location was closer to the vehicle charging connection near the front of the van. Once the voltage has been stepped up to 48 volts, moving the same amount of power toward the rear electrical system becomes much easier.
The visually neat answer and the electrically sensible answer are not always the same answer.
Fuse Sizes and Cable Sizes Are Not Details
Another lesson has been not to treat the wiring kit as unquestionable simply because it came as a kit.
At one point, the cable supplied for the MultiPlus DC feed was 2 AWG where the installation required 2/0. Those are very different conductors.
It would have been easy to look at the substantial cable, assume it was close enough and move on. Instead, I stopped and replaced it with the appropriate cable.
The same checking has happened with fuse sizes throughout the installation.
A fuse isn’t there because a diagram looks more complete with one installed. Its job is to protect the conductor and the circuit under very specific fault conditions.
That means I’ve spent far more time than I ever expected checking wire sizes, fuse ratings, lug sizes, torque specifications and the actual current on both sides of converters.
It is not glamorous work. It is also the part of the electrical system I least want to discover was wrong while sleeping inside the van.
Grounding Was Another Rabbit Hole
Grounding in a vehicle-based electrical system initially sounds straightforward. Negative goes to ground.
Then you start introducing a 48-volt battery system, inverter/charger, DC-to-DC chargers, solar controllers, a shunt, 12-volt conversion and the steel chassis of the vehicle itself.
Suddenly the words “just ground it” aren’t useful anymore.
The negative architecture needs to ensure that the shunt sees the currents it is supposed to measure while still bonding the house system correctly to the chassis. Equipment cases may also need their own protective chassis connections.
The vehicle side of the Sterling has different considerations from the house side.
Working through those details has been a recurring theme in this build: understanding what each wire is actually doing instead of simply connecting wires because a diagram shows lines between boxes.
The Cerbo GX Is Becoming More Than a Battery Display
One decision I made early was to use a Victron Cerbo GX and GX Touch. Initially, that is easy to think of as simply a nicer monitoring screen.
It has gradually become much more central to the build.
The Cerbo gives me one place to see the state of the electrical system, charging sources and battery. But because the GX platform can also run Node-RED, it creates the possibility of making the van’s systems interact intelligently.
That is influencing how I’m approaching lighting and ventilation. Rather than filling the walls with independent controllers that all know nothing about one another, I’m working toward a centralized architecture where the user interface, automation logic and actual high-current switching are separated.
The Cerbo can make decisions. Dedicated controllers can handle the loads. And physical controls can still exist where a software failure should not leave me sitting in the dark.
I like automation. I don’t like dependency.
06 / Controls and branch wiring
Lighting Has Become Its Own Electrical Project
The final lighting system isn’t installed yet, but the architecture is taking shape.
The intent is to use tunable-white or RGB+CCT lighting through much of the van. RGB lighting by itself is easy to find, but RGB is poor at producing genuinely useful white light.
RGB+CCT combines red, green and blue with separate warm-white and cool-white channels. That means the same fixture can provide warm evening lighting, cooler task lighting and useful white illumination while still retaining the ability to create coloured scenes.
The toe-kick lighting can also provide a true red night-light mode rather than simply dimming white LEDs.
The current plan divides the interior into independent zones including the main ceiling, front lounge, kitchen, shower, bed, garage and toe-kick areas.
Again, there is a trade-off. More zones mean more wiring and more control hardware. But once the walls are closed, wire is cheap and access is expensive.
Essential lighting will also have a physical fallback. If a Cerbo, network interface or automation routine fails, there still needs to be a way to turn on a light.
Shore power / Inverter output / Receptacles
The 120-Volt Side Is Finally Becoming Familiar
The AC side is now roughed in as well.
Shore power will feed the MultiPlus, which functions as both inverter and charger and manages the relationship between incoming AC power and the house electrical system. From there, the van has its own 120-volt distribution and branch circuits.
I’m using 12/2 cable for the receptacle circuits, with roughly eight outlets planned and GFCI protection where appropriate.
At this stage, much of the physical rough-in exists, but final breakers, receptacles and termination work are still ahead. There are also USB charging points and final 12-volt accessory wiring still to install.
What is interesting is how much less intimidating the AC wiring feels now than it did early in the project.
That isn’t because 120 volts has become less deserving of respect. It is because after working through 48-volt battery banks capable of delivering enormous fault currents, multiple DC voltage levels, alternator charging, shunts, DC grounding and communication networks, a conventional branch circuit starts to feel refreshingly understandable.
Packaging Everything Has Been as Difficult as Designing It
A wiring diagram has infinite space. A van does not.
The major heating and electrical equipment has been packaged into a framed cabinet area near the driver’s side rear of the van. That location was chosen partly because of the floor plan and partly because it helps distribute weight.
The driver side carries significant electrical and heating equipment, while the fresh-water tank is positioned on the passenger side around the opposite wheel area. Keeping heavy components near the rear axle was preferable to hanging all of that mass at the extreme rear of the vehicle.
But there are competing demands even within that cabinet. The MultiPlus needs ventilation. Batteries need secure mounting. Lynx equipment needs to remain accessible. The hydronic system has pumps, hoses, reservoirs and fittings that may someday need service.
Electrical components and plumbing should not simply be piled together because they happen to fit.
And every inch that cabinet gets taller pushes the north-south bed higher.
When you’re 6’3”, an inch isn’t an abstract measurement anymore. It is the difference between sitting naturally on the bed and feeling like you built your own crawlspace.
Photo placeholder
Making the systems fit
Replace with a wide interior photograph showing the framed equipment cabinets, wheel wells and future north-south bed position.
The van is essentially one large systems-integration project disguised as a woodworking project.
Everything affects something else.
07 / What the build is teaching me
One of the Biggest Lessons Has Been to Question the Diagram
I have used professional diagrams, manufacturer documentation and proven van systems as references throughout this build. That has been invaluable.
But one thing I’ve learned is that a diagram is the beginning of the reasoning process, not the end.
A wiring diagram doesn’t know my cable length. It doesn’t know where my Sterling charger physically fits. It doesn’t know the temperature extremes this van will encounter.
A hydronic schematic doesn’t know where the Transit chassis creates a high point in a coolant hose. A floor drawing doesn’t know I’m 6’3”. A component kit doesn’t know whether the supplied cable is actually correct for the exact configuration I’ve built.
The deeper I get into this project, the less interested I am in asking, “What does everyone else do?”
The better question is, “Why is it done that way, and does that reasoning apply here?”
Sometimes the standard answer is absolutely the right answer. Sometimes a seemingly minor detail becomes important once it is installed in this particular van.
Complexity Is Not the Same Thing as Fragility
This is unquestionably a complex van.
There is a gasoline hydronic heater. Radiant floor heating. Domestic hot water. Engine heat recovery. A 48-volt battery system. 12-volt conversion. 800 watts of solar. High-output alternator charging. A 5,000 VA inverter. A 48-volt rooftop air conditioner. Powered ventilation. Starlink. Networked monitoring. And eventually centralized lighting and environmental controls.
It would be reasonable to ask whether all that technology makes the van unnecessarily fragile. That has been in the back of my mind throughout the project.
My answer has been to try to make each system understandable and serviceable.
The floor-heating loop is physically simple even if the overall hydronic system is sophisticated. The 48-volt electrical system uses a recognizable Victron architecture rather than a custom collection of mystery components.
Critical lighting can still have physical switches. Roof systems remain physically accessible through the rear ladder.
The goal isn’t to eliminate complexity. It is to prevent complexity from becoming a single point of failure.
There Have Been Plenty of Small Decisions That Turned Into Big Ones
That may be the biggest surprise in the whole project. Very few decisions are actually isolated.
- Move a component six feet and suddenly the wire gauge changes.
- Add half an inch of insulation and the bed gets half an inch closer to the ceiling.
- Install a grey-water tank under the shower and now heating, insulation and drain routing all matter.
- Put 800 watts of solar on the roof and suddenly the position of the fan, air conditioner, Starlink and roof rack structure all matter.
- Mount the spare externally and now rear-door hardware, weight and access matter.
- Choose RGB+CCT lighting and suddenly you’re planning five-channel wiring before the walls are finished.
- Decide to recover engine heat and now you’re learning the Ford coolant circuit.
- Choose a 48-volt house system and now every 12-volt device requires you to think about where and how that conversion occurs.
Everything affects something else.
The current state
Where the Build Stands Now
At this stage, the hidden infrastructure is surprisingly far along. What remains now is much more about completing connections and transitioning into the next stage.
Built, installed or operating
- Insulated subfloor and connected hydronic floor loops.
- Aluminum heat spreader and marine-plywood floor.
- DUCK Liner and Thinsulate wall and ceiling insulation.
- Framed heating and electrical equipment cabinets.
- Underbody Espar installation, including fuel connection, combustion-air intake and exhaust.
- Internal hydronic equipment and main glycol plumbing, including heat exchangers, reservoir and mixing components.
- Main 48 V architecture: Epoch batteries, Lynx components, MultiPlus-II, MPPT, Cerbo GX and GX Touch.
- Sterling alternator charger installed.
- Orion and 12 V distribution panel in place.
- 800 W solar array mounted and operating.
- OutEquip Summit 2 installed and operational.
- Roof fan and Starlink internet functional.
- 50-inch front light bar installed.
- Rear spare-tire carrier and driver-side rear-door ladder installed.
- Shore-power and 120 V system roughed in.
The next stage
- Complete the hydronic electrical work, coolant fill, bleeding and commissioning.
- Plumb the potable-water side.
- Complete the Ford engine-coolant connections.
- Install the final 120 V breakers and terminations.
- Install the receptacles.
- Complete lighting, USB charging and the remaining 12 V branch wiring.
- Move into wall and ceiling panels and finished cabinetry.
Then I can finally start covering all of this work up.
The Strange Part About Building Infrastructure
There is something slightly painful about spending this much time building systems that will eventually disappear.
The routed floor heat is already buried. Soon most of the insulation will disappear behind finished panels. The carefully routed wiring will disappear into walls. Hydronic tubing will be hidden inside cabinets.
Electrical distribution that took weeks of planning may eventually be visible only when a cabinet access panel is removed.
But I’m starting to think that is the point.
The quality of a van conversion probably isn’t determined by the things that photograph well when the build is finished. It is determined by what is behind them.
It’s the wire that was sized properly. The hose you can still replace. The thermal break nobody can see. The fuse that was chosen for the conductor rather than because it happened to come in a kit.
The insulation that continues behind the cabinet. The service loop left on a cable. The access panel you hopefully don’t need for another five years.
Those things aren’t particularly exciting once the cabinetry is finished.
Right now, though, they are the build.
What I’ve Learned So Far
I started this project already comfortable working with tools and technology. That did not mean I knew how to build a camper van.
I’ve had to learn about heat transfer, XPS compressive strength, oxygen-barrier PEX, hydronic mixing, expansion tanks, coolant loops, galvanic corrosion, automotive fuel fittings, high-current DC wiring, fuse coordination, battery communication, inverter installation, DC-to-DC conversion, solar strings, grounding, shunts, roof loading, ventilation, air conditioning, lighting control and more.
Just as importantly, I’ve had to learn when to stop and question something.
I’ve bought parts that turned out not to be the right parts. I’ve changed plans after realizing there was a better way. I’ve found situations where the documentation was technically correct but didn’t make sense until I understood why it was correct.
And I’ve learned that sometimes the right decision is simply to leave something unfinished until I actually understand it.
There are much faster ways to build a camper van. But the objective here was never to build one as quickly as possible.
The objective was to build a van that works the way I want it to work, in the places I want to take it, in weather that isn’t particularly forgiving.
Right now it still looks like a construction project. Wires are visible. Plumbing is visible. Cabinets are frames instead of finished furniture.
But much of the van already works. It can harvest solar energy. It can charge from the Transit alternators. It can produce household AC power. It can run a 48-volt air conditioner. It has ventilation. It has satellite internet. The hydronic heating system is close to commissioning.
And the systems that once existed only in diagrams and piles of boxes are becoming part of the vehicle.
There is still a long way to go.
Photo placeholder
It’s beginning to feel like one vehicle
Replace with a rear-door view into the unfinished interior at dusk, with the GX Touch or temporary interior lighting on.
But it’s finally starting to feel like a camper van.
MADCTY · Building the infrastructure · The next chapter: commissioning and living with the systems.
Related Posts




Sign up with your email and always get notifed of Avada Lifestyles latest news!